


In a 3D printer motion system, the Z axis usually does not require the same high speed as the X and Y axes. However, it has a direct influence on machine stability, bed lifting, layer consistency, and long-term printing performance.
If the print bed does not move smoothly, if a large heated platform tilts during lifting, or if the Z-axis structure is not rigid enough, the final print quality can be affected.
Many desktop DIY 3D printers use a T8 lead screw on the Z axis. This is a simple and cost-effective solution for small printers with light loads and short travel. But when the printer becomes larger, the heated bed becomes heavier, or the machine is used for industrial printing or hybrid processing, a standard T8 lead screw may start to show limitations in rigidity, efficiency, smoothness, and long-term stability.
In these cases, a ball screw becomes a more practical option for the Z-axis lifting system. It is not a necessary upgrade for every 3D printer, but it can be a better choice for Z-axis systems that require higher load capacity, smoother vertical motion, longer travel, and custom end machining.
This guide explains the basic function of the X, Y, and Z axes in a 3D printer, why ball screws are more commonly considered for the Z axis instead of the X/Y axes, how to choose between a lead screw and a ball screw, and how to select the right 3D printer Z axis ball screw based on diameter, lead, nut type, stroke, and end machining.
What Do the X, Y and Z Axes Do in a 3D Printer?
A 3D printer moves in three main directions: the X axis, Y axis, and Z axis.
- The X axis usually refers to left-and-right movement. It controls the position of the print head or nozzle in the horizontal direction.
- The Y axis usually refers to front-and-back movement. Depending on the printer structure, it may move the print head, the bed, or part of the gantry system.
- The Z axis refers to vertical movement. It controls the up-and-down motion of the print head, heated bed, platform, or gantry.
In simple terms, the X and Y axes form the shape of each printed layer, while the Z axis controls the height between layers. During printing, the nozzle moves in the X/Y plane to create one layer. After that layer is completed, the Z axis moves by one layer height, and the next layer begins.
This difference also explains why the three axes often use different motion structures. The X and Y axes usually need fast, lightweight, and responsive movement. The Z axis usually moves more slowly, but it must remain stable and may need to carry more weight.
Because of this, the X/Y axes and the Z axis are often designed with different transmission methods.

Why Ball Screws Are Not Commonly Used on the X/Y Axes
Ball screws can be used on the X and Y axes in some special machines, but they are not the common choice for most FDM 3D printers. In many desktop or DIY printers, the X/Y axes use belts for driving motion, together with smooth rods, linear shafts, or linear guide rails for guidance.
This point is important: smooth rods or linear guide rails provide guidance, while belts provide the actual driving motion. The rods or rails keep the moving parts on a straight path. The motor and belt system create the movement.
There are several reasons why ball screws are usually not preferred for the X/Y axes of common 3D printers.
First, the X and Y axes require high speed and frequent acceleration. The print head changes direction many times during each layer. A lighter transmission system helps the machine respond faster. Belt transmission is lighter and more suitable for this kind of repeated high-speed movement.
Second, a long ball screw rotating at high speed can be limited by critical speed, vibration, and installation accuracy. If the screw is long and the axis moves quickly, the screw may generate noise, vibration, or unwanted motion errors unless the entire structure is designed very carefully.
Third, belts are already sufficient for many FDM printing applications. For desktop printers, DIY printers, and many CoreXY designs, belts offer a good balance of speed, cost, and installation flexibility.
For this reason, a common structure in many 3D printers is:
X/Y axes: smooth rods or linear guide rails for guidance, and belts for driving motion.
This is also why ball screws are more often discussed for the Z axis rather than the X or Y axes in 3D printer applications.
Why the Z Axis Often Uses Lead Screws or Ball Screws
The Z axis works differently from the X and Y axes. It does not usually need fast back-and-forth movement. Its main job is to move the bed, platform, print head, or gantry up and down while keeping each layer height stable.
In many 3D printers, the Z axis supports the heated bed, printing platform, X-axis beam, or even the whole gantry structure. The movement speed is usually low, but stability, load capacity, and repeatable vertical motion are important.
That is why the Z axis often uses this kind of structure:
smooth rods or linear guide rails for guidance, and a lead screw or ball screw for lifting motion.
Both lead screws and ball screws convert rotary motion from a motor into linear motion. The difference is in how the nut and screw interact. A lead screw works mainly with sliding friction. A ball screw works with rolling contact through recirculating balls.
For many desktop 3D printers, a T8 lead screw is already enough. For larger printers, heavier beds, longer Z-axis travel, or more demanding mechanical systems, a ball screw can provide better efficiency, smoother motion, and better long-term performance.
This is why many users looking for a 3D printer ball screw are actually focusing on the Z-axis lifting structure.
Lead Screw or Ball Screw: Which Is Better for a 3D Printer Z Axis?
The choice between a lead screw and a ball screw should not be based only on which one looks more precise. It should depend on the actual machine structure, load, travel, cost, and stability requirements.
A T8 lead screw, also called a trapezoidal lead screw, is a common choice for many DIY 3D printer Z axes. It is simple, affordable, easy to install, and often has better self-locking behavior. For small desktop printers, a lead screw can usually provide enough vertical motion performance.
A ball screw has higher transmission efficiency, lower friction, and smoother movement. It is more suitable for Z-axis systems with heavier loads, longer travel, or higher stability requirements.
However, a ball screw also costs more and requires better alignment, proper support units, suitable end machining, and regular lubrication.
A simple selection guide is shown below:
| Application Scenario | More Suitable Option |
|---|---|
| Small DIY 3D printer | T8 lead screw |
| Common desktop FDM printer | Lead screw |
| Low-cost and simple structure | Lead screw |
| Medium or large Z-axis upgrade | Lead screw or ball screw |
| Large heated bed lifting | Ball screw |
| Heavy platform or gantry lifting | Ball screw |
| Industrial 3D printer | Ball screw + linear guide rail |
| CNC and 3D printer hybrid machine | Ball screw |
A ball screw is not required for every 3D printer. For small and light desktop printers, it may be more than necessary. But when the Z-axis load becomes heavier, the travel becomes longer, the platform becomes wider, or the machine is closer to industrial equipment, the advantages of a ball screw become more meaningful.
In short:
A lead screw is suitable for low-cost, light-load, desktop Z-axis systems. A ball screw is more suitable for heavy-load, large-format, long-stroke, or industrial Z-axis systems.
How to Choose a Ball Screw for a 3D Printer Z Axis
Once you decide that the Z axis needs a ball screw, the next question is not simply "which ball screw is the best?" The better question is: which ball screw matches the actual printer structure?
When choosing a ball screw for a 3D printer Z axis, the most important factors are diameter, lead, nut type, total length, effective stroke, and end machining.
Choose the Diameter Based on Z-Axis Load
The ball screw diameter affects rigidity, load capacity, and resistance to bending. A larger diameter usually provides better stiffness, but it also increases cost, weight, and space requirements.
For a 3D printer Z axis, it is not always better to choose the largest screw. The diameter should match the bed weight, platform size, frame rigidity, and travel length.
A general reference is shown below:
| Ball Screw Model | Suitable Application |
|---|---|
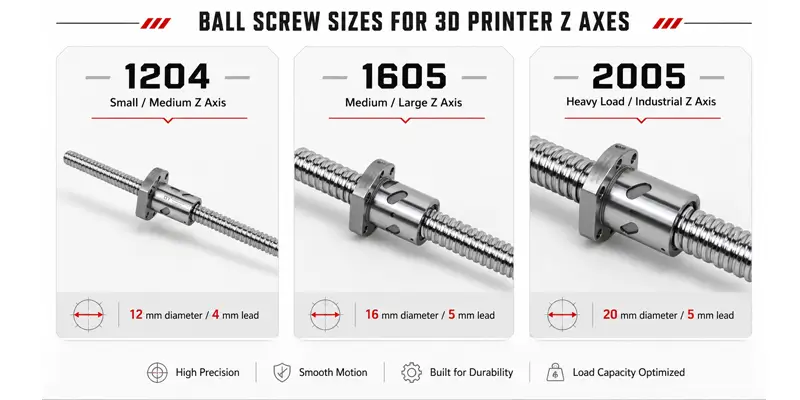
| 1004 / 1204 | Small or medium Z axis with lighter load |
| 1605 | Medium to large 3D printer Z axis, common stable option |
| 1610 | Z-axis structure requiring faster vertical movement |
| 2005 / 2010 | Large-format, heavy-load, or industrial Z axis |
For a small DIY printer, a 1204 ball screw may already be enough.
For a medium or large 3D printer, a 1605 ball screw is often a practical and balanced option.
For a heavy heated bed, wide platform, or industrial machine, 2005, 2010, or larger sizes may be considered.
For many medium and large 3D printer Z-axis systems, a 1605 ball screw is a common choice because it offers a good balance between rigidity, control, cost, and installation availability.
Choose the Lead Based on Motion Requirements
The lead means how far the nut moves when the screw rotates one full turn.
For example:
- 1204 ball screw: 12 mm diameter, 4 mm lead
- 1605 ball screw: 16 mm diameter, 5 mm lead
- 1610 ball screw: 16 mm diameter, 10 mm lead
- 2005 ball screw: 20 mm diameter, 5 mm lead
For a 3D printer Z axis, very high speed is usually not the main requirement. Stability, controllability, and layer consistency are more important.
A smaller lead provides finer movement and higher mechanical resolution. It is better for stable lifting and controlled vertical movement. A larger lead allows faster movement, but it may require more motor torque and more careful control.
For Z-axis selection, the following logic is usually practical:
- 4 mm or 5 mm lead: better for stable Z-axis lifting
- 10 mm lead: suitable for special structures that need faster vertical movement
Heavy-load Z axis: avoid choosing a large lead only for speed
For most 3D printer Z axis ball screw applications, models such as 1204, 1605, and 2005 are easier to control and better matched to the low-speed, stable movement of the Z axis.
Choose the Nut Type Based on Mounting Space
The ball screw nut must match the printer's mounting structure. In many cases, the problem is not the screw itself, but whether the nut can be installed properly.
For 3D printer Z-axis systems, a flange nut is often the most common choice. It has mounting holes and can be fixed more easily to a lifting plate, Z-axis bracket, or platform structure.
Common nut types include:
| Nut Type | Suitable Use |
|---|---|
| Flange nut | Most common, easy to mount |
| Cylindrical nut | Compact structure, requires a custom nut holder |
| Double nut | Lower backlash and higher rigidity, suitable for industrial use |
Most ordinary 3D printers do not need a double nut. A double nut costs more and takes more space. It is more suitable for high-rigidity, low-backlash, or industrial lifting systems.
For most Z-axis designs, the most important questions are: Can the nut be mounted firmly? Are the mounting holes convenient? Is the nut holder rigid enough?
Confirm Total Length and Effective Stroke
When choosing a ball screw, it is not enough to say, "I need a 500 mm screw." The total screw length is not the same as the usable Z-axis stroke.
A 3D printer Z-axis ball screw needs to consider:
- total screw length
- effective stroke
- threaded length
- nut length
- space taken by the support unit
- space taken by the coupling
- upper and lower mounting positions
- actual platform travel range
If these dimensions are not confirmed in advance, the screw may look long enough, but after the support unit, coupling, and nut are installed, the actual Z-axis travel may not be sufficient.
For large-format or custom 3D printers, it is better to confirm the maximum Z-axis travel from the machine structure first, and then determine the total screw length and end machining dimensions.
This step is especially important for custom Z-axis ball screw projects, because many 3D printers do not simply use standard screw lengths. The ball screw often needs to match the frame, motor position, support unit, and available mounting space.
Confirm End Machining for Motor and Support Units
End machining is one of the most easily overlooked details when selecting a ball screw for a 3D printer Z axis. It directly determines whether the ball screw can be installed into the machine.
The machined ends of a ball screw usually need to match:
- stepper motor or servo motor
- coupling
- support unit
- bearing
- locking nut
- mounting plate
- Common ball screw end machining details include:
- stepped shaft machining
- bearing seat diameter
- threaded end
- retaining ring groove
- keyway
- flat surface
- chamfer
- custom length machining
For example, the motor shaft diameter, coupling bore size, support unit model, and bearing inner diameter all affect the end machining dimensions. Even if the screw diameter and lead are correct, the ball screw may still fail to fit the machine if the machined ends do not match the motor coupling, bearing support, or mounting structure.
Before ordering a Z-axis ball screw, it is helpful to confirm:
- motor shaft diameter
- coupling size
- support unit type
- fixed-end and supported-end structure
- end machining drawing
- whether a nut holder or support unit is also needed
For equipment manufacturers or batch buyers, end machining capability is very important. A Z-axis ball screw is not used alone. It must work together with the machine frame, motor, support unit, nut holder, and linear guide system.
Single or Dual Z Axis Ball Screws?
Whether to use one or two Z-axis ball screws depends mainly on platform width, load distribution, and structural stability.
For a small printer, a single Z-axis screw may be enough if the platform is narrow and the load is light. This structure is simple, lower in cost, and easier to control.
For a wide platform, large heated bed, or heavy gantry structure, dual Z axis ball screws can provide better support. Two screws can support both sides of the moving structure and reduce tilting or uneven loading.
However, dual Z design is not simply a matter of adding one more screw. The key issue is synchronization. If the two screws do not move together, one side of the platform may become higher than the other, which can affect print quality.
A dual Z-axis design should consider:
- same ball screw model on both sides
- same installation height on both sides
- synchronized motor control
- timing belt connection if needed
- rigid platform structure
- linear guide rails for better guidance
For medium, large, or heavy-load 3D printers, dual Z ball screws are more common. For a small DIY printer, using dual ball screws only to make the structure look more advanced is usually unnecessary.
Conclusion: The Right Z-Axis Ball Screw Is the One That Matches the Machine
The X, Y, and Z axes of a 3D printer have different motion requirements. The X and Y axes are mainly responsible for fast planar movement, so they commonly use belts for driving motion and smooth rods or linear guide rails for guidance. The Z axis is responsible for vertical lifting and may need to support the bed, platform, or gantry, so it often uses a lead screw or ball screw.
For ordinary DIY 3D printers and desktop FDM printers, a T8 lead screw is simple, affordable, and sufficient for many Z-axis lifting applications.
For medium and large 3D printers, heavy heated beds, long-stroke Z axes, industrial printing equipment, or CNC/3D printer hybrid machines, a ball screw can provide better load capacity, smoother movement, and more stable long-term operation.
When choosing a ball screw for a 3D printer Z axis, it is not enough to compare only price or diameter. The right ball screw should match the actual machine structure.
A suitable Z-axis ball screw should be selected based on:
- Z-axis load
- printer size
- ball screw diameter
- ball screw lead
- ball nut type
- total length and effective stroke
- ball screw end machining
- ball screw support unit and coupling
- linear guide system
- single or dual Z-axis design
For a small and light DIY printer, a lead screw may already be sufficient. If the Z axis needs to carry a heavier platform, provide smoother lifting, or work in an industrial machine, a ball screw becomes a more suitable option.
The right ball screw is not always the largest one. It is the one that matches the printer's load, stroke, mounting space, and motion requirements.
Related Articles:
1.Ball Screw 3D Printer Guide: When Should You Use Ball Screws in a 3D Printer?
2.What are linear rails for 3D printing?
3.Are Linear Guides Really Better Than V-Wheels or Rod Systems for 3D Printers?
4.Linear Rails vs Linear Rods: Which Motion System Is Better for CNC and 3D Printers?
Email: dlyexport2@dlybearing.com


